
When it comes to interior painting projects, achieving a smooth finish is a goal that every homeowner (and professional painter, for that matter) strives to accomplish.
So, how do you get that gorgeous finish?
Technique definitely comes into play, plus experience and training. Many people don’t fully realize what goes into becoming a professional painter, and how a trained craftsperson can deftly cut clean lines and roll a flawless wall. It doesn’t just happen!
It also comes down to having the right tools.
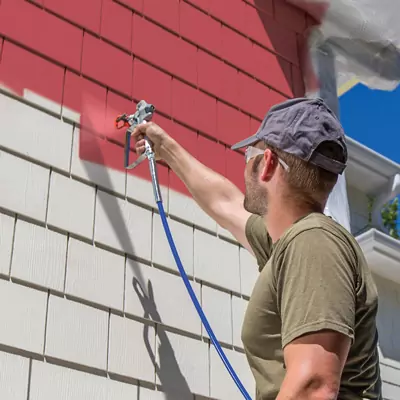
One tool in particular has revolutionized the painting industry and made it easier to achieve professional-looking results: the paint sprayer. In this article, we will explore the advantages of using paint sprayers, discuss the different types available, and provide valuable tips and techniques for learning how to use it to its full potential.
What’s the Advantage of Using a Paint Sprayer?
Paint sprayers offer several advantages over traditional brush and roller methods. Here are a couple of the biggest:
- You can save time, particularly on large-scale projects. A paint sprayer lets you cover larger areas in a fraction of the time it would take with brushes or rollers.
- The even coverage provided by paint sprayers translates to a uniform finish – no pesky brush or roller marks. This results in a more professional-looking outcome, taking your project to the next level.
Choosing the Right Paint Sprayer
First, it’s essential to select the appropriate equipment for your specific project. Let’s quickly run through the different types of paint sprayers available:
- Airless
- HVLP (high volume, low pressure)
- Compressed air sprayers
What’s the difference?
As their name suggests, airless sprayers don’t use air, meaning that instead of relying on compressed air to atomize the paint, they use a hydraulic pump to generate super high pressure, then force the paint through a small nozzle. The result is a very fine mist, and thus the potential for very fine finishes.
HVLP paint sprayers do use compressed air, resulting in larger paint particles and less overspray (spray can be easier to control and contain than a mist). They also are known for creating smooth, even coats.
Lastly, compressed air sprayers operate by drawing paint from a container or paint reservoir and combining it with a stream of compressed air. This creates a fine mist of paint particles, which are then propelled onto the surface being painted. It’s an ideal approach for efficient and even coverage, making compressed air sprayers suitable for a range of projects, from small-scale touch-ups to larger surfaces.
One of the primary advantages of compressed air sprayers is their ability to handle a wide range of coating materials, including solvent-based paints, lacquers, primers, and enamels. This versatility makes them a popular choice for professional painters, contractors, and automotive refinishers who require flexibility in their painting applications.
Surface Preparation
No matter which type of sprayer you use, proper surface preparation is crucial.
Start by thoroughly cleaning the surface to remove dirt, dust, and grease. Next, repair any damage like cracks or holes, and ensure the substrate is smooth and clean. This step sets the foundation for a successful paint job and helps to eliminate potential imperfections. Details are king!
Proper Masking and Protection
Paint sprayers are definitely efficient, but remember that they’ll generate overspray and mist. Even the fine paint particles in the air can travel to other surfaces in your home, landing like dust. To prevent this, you absolutely have to invest some serious time in masking off windows, doors, trim, furniture, and any other areas that should not be painted. Painter’s tape, plastic sheets, and drop cloths are your new best friends. By controlling and containing the environment you’ll protect the rest of your home and make cleanup a snap.
Adjusting and Testing the Spray Pattern
To achieve optimal results with a paint sprayer, it is crucial to adjust the spray pattern and pressure settings accordingly. The spray pattern can be adjusted to different widths, depending on the desired coverage and the area being painted. Also, testing the spray pattern on a scrap piece of material or a small inconspicuous area before starting the main project is highly recommended. This allows you to fine-tune the settings.
Techniques for a Smooth and Brush-Free Finish
Full disclosure? You can’t buy a paint sprayer, unbox it, and automatically be a pro. Most spray technicians are highly trained and supervised until they have proven proficiency, much like an apprenticeship program. It’s both a science and an art! Here are a few quick tips to help you fast-track your skills:
- Maintain a consistent distance and angle between the sprayer and the surface being painted to ensure an even coat.
- Overlap your passes (almost like mowing a lawn) to avoid uneven coverage and to blend the paint seamlessly.
- Avoid excessive build-up of paint in one area, as this can result in drips and an uneven finish.
Proper Cleaning and Maintenance
Trust us: proper cleaning and maintenance of your paint sprayer are essential for its longevity and performance. Otherwise you’ll have messy clogs, uneven spray patterns, and inconsistency on your hands.
After each use, thoroughly clean the paint sprayer to remove any residual paint. Refer to the manufacturer’s instructions for specific cleaning procedures, as different parts of the sprayer may require different cleaning methods. When you’re done, store the paint sprayer in a clean and dry environment, once again following the manufacturer’s recommendations.
Practice and Patience
As we mentioned above, this can be a real learning curve. Take the opportunity to practice on small projects or scrap materials to hone your skills, playing with different techniques and settings too. It’s definitely a skill worth learning though, and can be extremely fun and satisfying.
What’s Your Takeaway?
Take your time. Research the type of sprayer you should get. Learn and practice. Practice and learn.
As always, if you feel like you’re getting in over your head, don’t hesitate to call a local professional painting contractor, especially if your paint project is larger-scale or complex. It’s definitely best to start small with your projects until you feel really comfortable.
Have any other questions? Contact us at New Look Painting! We’re here to help and offer all the services you need to keep your Grand Rapids home looking incredible.